Showing posts with label Creativity. Show all posts

Tuesday, January 3, 2023

Why am I building this model?

Some of you will laugh at me, but I have to fess up.

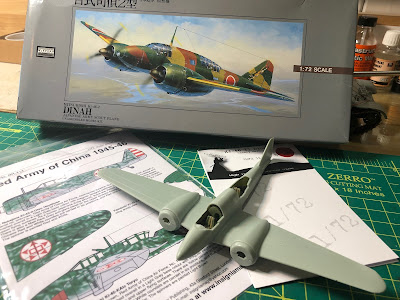
A few days ago I was filling a nasty seam on this Arii 1/72 Ki-46 Dinah and found myself wondering, why am I building this model?


I've had the model in my stash for over 10 years, and as you can see I've also purchased aftermarket decals and the KV Models Canopy mask.

The thing is, I barely have a passing interest in Japanese aircraft, and I don't have a strong affinity for the Ki-46 in particular. The only reason I can think of for my decision to build the model is that its paint scheme won't be blue or grey. (The last model I built was an F-4S in the Ferris scheme, so to avoid the monotony of painting the same color over and over again, I try to select a different palate for each successive model I build.)

I don't have to tell any of you that when our heart isn't in a build, the process of building the model isn't satisfying. I don't look forward to spending time with the Dinah. Ultimately, I don't really care if the outcome is mediocre.

As I'm building the Dinah, I'm surrounded by a few hundred other models that I find much more compelling. Those are the models that should be on my workbench, not this one nor any other model that doesn't excite me.

I'll share more about the implications of this realization in the coming weeks, but I think it's interesting to consider why we build what we build. Or if we should be building something else.

Wednesday, July 7, 2021

My go-to books

 It’s 10pm. You’re tired. Too tired to work on a model. You’re bored with the internet. But you want to feed your interest in the hobby, so you pull a few books off the shelf and browse them. What books do you typically select?

I had an interesting conversation with friends last week when someone asked what our go-to books are when we want to kill time or find inspiration. Because I often grab a book off the shelf when I want to read in bed, it was pretty easy for me to share my favorites.

Diego Quijano has inspired me for a long time, so his books are always within reach. His encyclopedia series offer a ton of rich content, so every time I browse them I’m reminded to try something new.


I can say the same thing about Adam Wilder’s books on armor. They are perfectly illustrated and offer a wealth of techniques and inspiration.


I’m a sentimental old fool, so Squadron’s line of books have long-offered more than a few ideas and always get my creative juices flowing and eager to start something new.


For armor subjects, Concord’s books are jam packed with excellent photos of armor in action. They are out of print now, but they’re an excellent value when you can find them online or at contests.


There you have it. What books do you find yourself looking at over and over?

Saturday, March 9, 2019

More base ideas from The Container Store

A few years ago I gave you some creative ideas for bases and mentioned The Container Store as a potential source of items you can re-purpose as bases. I recently visited my local store and noted several items that are currently available. Many of them can be used exactly as purchased, or you can paint them to make them more suitable for your latest model.

Stackable bamboo drawer organizers come in a variety of sizes, and when flipped over and a suitable surface applied (such as sheet plastic or a mirror cut to size), provide a 1-2 inch high base for any model. A bargain at between $3 to $8.


These display cubes come in only two sizes, 6” x 3 1/2” x 6” and 9” x 3 1/2” x 9”, but they’re perfect for armor, vignettes, and small dioramas. They come in brown, white, and black finishes.


These lacquered storage boxes come in four sizes and seven colors, and you can use the box itself for a base (think of the pedestal-like bases popular in European contests) as well as the lid; just flip them over! These cost between $8 and $20.


These accessory trays are similar to the lacquered storage boxes but are more shallow and without lids. Available in three sizes, they’re probably most suitable to small aircraft and armor.


While you’re in the store, keep an eye out for Novus’s polishing products, which you'll need for polishing aircraft canopies. They’re available individually in 8 oz. bottles and as a 2 oz. set.


Remember, the base you use can either complement or detract from a great looking model!

Sunday, September 17, 2017

Sausage gravy and the slow demise of craftsmanship

Editor's Note: After you read this article, be sure to read my follow-up, Reconsidering cheating.

Having grown up in the South one of my favorite breakfasts is sausage gravy over biscuits. After I graduated and left home I enjoyed frequenting a little mom & pop restaurant when I was home on vacation, always ordering the gravy and biscuits. It wasn’t the best I’d ever had, but I liked the idea of getting home cooked food over the mass produced stuff served in chain restaurants. You can imagine my dismay when I peeked into the kitchen during one visit and saw the crew opening a can of pre-made sausage gravy. I never went back to the restaurant again. They were cheating, taking short cuts to satisfy their customers. (On hindsight that probably explains why I could eat breakfast there for around five dollars.)

Two weeks ago there was a brief but lively debate on the WingNut Wings Fans Facebook group when one of its members posted a link to LF Models’ new prefabricated wooden propellers. Several of us expressed our view that using these prop constituted something akin to cheating. One member said, "This is modeling equivalent of turning in homework that you didn't do yourself." He's right.

LF Model's propeller for the Albatros D.I-V, Fokker Dr.I and D.VII, Pfalz D.III, and Roland D.V and C.II.
To be sure, the propellers looks amazing, and why shouldn’t they? They appear to have been manufactured exactly like the real thing, with laminated layers of multi-color woods, shaped, and polished, complete with an aluminum hub. The “modeler” will spend more time removing the prop from the packaging than he will attaching it to the model.

As you might imagine more than a few modelers in the Facebook group will buy LF’s props, and predictably they defended their right to do so. I don’t begrudge them the desire to create a better representation of an Albatros D.III or Fokker D.VII, but I do believe that using these props removes a good bit of craftsmanship that forms the basis of scale modeling. Using these props is cheating. Period.

“Cheating?” said another member. "If this is cheating then so is using Eduard photoetch, Yahu instrument panels, and resin replacement parts.” And he’s absolutely right. When you use those products, you introduce elements into the model that aren’t the product of your mind and hands, and the your model then only partially reflects your skill as a modeler. You’re another one, two, three steps further removed from being an "artist" (not that modeling is art). Yes, there is a degree of skill required to properly clean up, assemble, attach, and paint photoetch or resin, but not nearly as much as creating those components yourself using plastic, metal, and other media. One of the modelers that inspired me early on, Bob Steinbrunn, used very little, if any, aftermarket and produced amazing representations of aircraft in scale. He, my friends, is a true craftsman.

Some of you reading this will take my argument to an extreme, setting up a straw man by suggesting that modelers should create their own paint and glue. Or scratchbuilding models completely, eschewing kits entirely. That might be true, but I’d make a distinction between products used to construct and paint a model and products used to replace or add components of a model.

Here’s the deal. If you use wooden props, photoetch, resin cockpits, and so on, it's okay. There are valid reasons for doing so, but admit that you’re cheating. It’s okay to take shortcuts to create the models that you want to display in your display case, but realize that a bit of your craftsmanship is lost in the process.

I’m a cheater myself. Look at the photo below, which shows a small selection of the canopy masks, resin, and gun barrels in my stash. I could mask canopies on my own (as I am for an ESCI 1/72 AV-8A Harrier), but Eduard’s and Peewit’s products make the painting process faster and the results more predictable, and that is important to me. And maybe those wooden props are important to you.


We're cheaters.

You can learn more about the LF Models wooden propellers here.

Thursday, December 29, 2016

My disappointing year

Every December Hyperscale readers post photos of the models they built throughout the year, but while many modelers are enjoying the fruits of their 2016 efforts, my look back is leaving me dejected. I had a terrible year. Not only was my output low, but the quality of what I finished was below my expectations.

I like to think that my skills are growing from year to year, but if 2016 is any indication, my skills are declining. It began with my build of the Airfix 1/72 P-40, a project that was originally conceived as being a super-detailed build, complete with cockpit, engine, and open ammunition bays. The model quickly went south when I struggled to find a way to properly mount CMK’s resin engine to the fuselage, and I had to scrap the kit and buy a new one. And I struggled through it as well.


I also fought Hobby Boss’s 1/72 Rafale M to its mediocre end. Like the P-40, I had to buy a second kit after I screwed the pooch on the first one, and the final result does not reflect my best work.


(You can read more about both models here.)

I’ve had issues with my most recent build as well, Academy’s 1/72 F-16C. I didn't properly address a seam in the intake, which now looks horrible, and I failed to anticipate the consequences of attaching the ventral strakes prior to applying the complex Thunderbirds decals to the lower fuselage. When I tried to apply the aft-most decal, it wouldn’t fit around the strakes and  after trying to cut it and slice it to make it fit  I had to discard it.


Last but not least was another ill-fated attempt at armor. I started Trumpeter’s Pz.Kpfw 38(t) with optimism, but as you can see in the picture below the final application of pigments resulted in a total mess. My hat's off to those of you who’ve mastered the use of these media, but I’ve decided to go back to techniques that I’m comfortable with and refine my own style rather than copy the style of others.


As I look at what went wrong with these models I think it all comes back to planning. I need to better visualize every model’s assembly and the consequences to its painting and weathering. 2017 has to be better.

Friday, September 11, 2015

Solving the problem that is yellow

I often see conversations on ARC and other forums about painting yellow. It seems to be one of the more challenging colors to work with. I've never had to paint a large area of yellow myself, but with a few models in the stash that will eventually call for yellow (T-6/SNJ, T-28, Blenheim), I've been anxious to see if it’s as hard a color to apply as people seem to imply. Of course I'd use my paint of choice, Tamiya.


Before accepting the challenge, it might be helpful to briefly review basic color theory.

Three attributes define all colors:
  • Hue – the simple name for a color, such as yellow, red, blue.
  • Lightness – a color’s value in terms of whether it can be described between two poles of light and dark (or black and white).
  • Saturation – a color’s colorfulness, that is, whether it’s intense or dull or somewhere in between.
Let’s talk about hue. I’ll share a simple thought: Yellow, even a specific pigment such as FS 33538, is basically…yellow! As I suggested in this post a year ago, don’t obsess over finding or using a “correct” yellow for your model. Be content with a color that any reasonable person would identify as yellow.

That leaves us with lightness and saturation. There are many factors that affect the specific yellow that you see on a 1:1 scale airframe. There’s the sun's illumination and its light being filtered through clouds, real-world weathering, variations in the manufacture of the color used on the actual aircraft, the correct mixing and application of the paint in the factory or field, etc. Likewise, there are many factors that affect the specific yellow that you see on a scale model. The light in the room, scale effect, the paint you used, your ability (and a viewer’s ability) to correctly see color, and the memory that you (and a viewer) have of what they think the correct color should be.

Those factors affect the lightness and saturation of the colors that we see. Accepting these variables and knowing that you cannot control all of them makes it easier to be comfortable applying a color to your model that looks like yellow.

The challenge with painting yellow is the opacity of most paints. They generally don’t cover well, so you have to use a thick application or many thin applications. The former is problematic because thick paints don’t flow efficiently through an airbrush, and the latter is problematic because many layers of paint tends to obscure detail.

With all this color theory in mind, I set out on an experiment by selecting a suitable model, Sword’s 1/72 Northrop N-9MA Flying Wing. Pretty crude kit, but the point of the project was learning how to paint yellow not superdetailing. Nevertheless, I added a few things here and there, particularly splitter plates inside the leading edge air intakes, and I had to scratchbuild a new front landing gear when the kit piece broke.

Earlier this week I arrived at the painting stage. First I applied a suitable blue to the underside of the aircraft, custom mixed by eye. Simple.

Then I thought through an approach to yellow that would address the challenges I described earlier. Most modelers suggesting a white undercoat prior to the yellow. I’m not one to apply bright, true colors to my models, so I decided to try something different. I wanted to try a tan color with a marked yellow hue. I decided on Tamiya XF-59 Desert Yellow mixed 50:50 with XF-3 Yellow, the paint I would use for the main color. I theorized that tan would provide a deep primer color that would not subsequently require copious amounts of yellow. And I was right; the color was perfect for a reasonable application of yellow.

In thinking about the final yellow, I’d read that opacity was problematic, so I decided to follow this “tan theme” and mix a bit of the same Desert Yellow into the main yellow color, which I theorized would increase its opacity. I used Tamiya XF-3 Yellow, XF-59 Desert Yellow, and XF-2 White in a 4:1:1 ratio respectively, the white used to bring down the color a bit for scale effect. Again, the result was a satisfactory color that, I think, is slightly lower in saturation than it would’ve been had had I used the pure yellow out of the bottle.

I’m very happy with the result, especially after some subtle post-shading, though to be self-critical I don't think I used the right color to tint the yellow. A pin wash and weathering will ultimately follow, which I expect will alter the finish a bit.

As you approach painting challenges, I encourage you to think outside of conventional wisdom. Follow your intuition. Try something new. Make your own path. You might be surprised what you learn along the way.

Friday, December 5, 2014

Creative ideas for bases

The right base can set your model apart from the others in a contest or simply when displayed in your home. A base highlights a model as a frame complements a drawing, print, or painting. Finding suitable bases can be a challenge, so here are a few ideas that you might not have considered.

Award plaques


Check with local award shop, the businesses that provide trophies and plaques to schools and sports leagues. Many will sell you the blank wood bases used for award plaques outright, and they sometimes have plaques that have gone unsold that you can buy on the cheap.

If you're lucky to have won at a few contests over the years, you can re-purpose the awards as display bases. I've never been one to have a "love me" wall where I display all my winnings (there really aren't that many), so I sometimes remove the aluminum applique from an award, apply rectangular sheet plastic painted to represent flightline, tarmac, or groundwork, and boom! I have a nice base.

Here's an Egyptian T-34/122 conversion on a wood award base, with groundwork created from Celluclay.


Here's a 1/72 F-16A on a base from which I've removed the applique. All it needs is a piece of suitably sized and painted plastic to make it complete. Or a mirror even.


Draw organizers


Visit any home furnishing store and you'll find a variety of wood boxes that are used for organizing the contents of kitchen or bathroom drawers. You can paint them (or not), flip them over, and apply a piece of plastic to represent a flightline or groundwork. The Container Store is a particularly good source for these.


Here's a 1/72 Gripen on a narrow organizer (which I have yet to paint and finish) but you can see the general effect that a higher base provides.


Wall cubes


When you’re at a home furnishing store with SHMBO, look for the deep, square cubes that are intended to be mounted on a wall for displaying bric-a-brac. I’ve seen them in black, white, and oak. Laid flat with a suitable surface applied they provide a pedestal for displaying models.


Frames


Frames can provide the, um, framework, for a variety of eye-catching bases. Michael’s, HomeGoods,  and similar shops have a huge variety of bases, so think creatively as you browse the store. Each of the models below rests on a base created from a frame.


Cabinet doors


If you have a cabinet shop near you, they may have surplus cabinet doors for sale. You can find them in many shapes and sizes, so look for those that will fit certain types or sizes of models. For example, a long and narrow aircraft or vehicle (such as my Su-15 below or an SdKfz 231 8-rad) will look good on a long narrow base, while a shorter aircraft or vehicle (MiG-3 or Pzkpfw Ib) will look good on a square base.


 If you need a large base for your next epic, Letterman-esque diorama, I found these at Ikea a couple of years ago. I don't remember exactly how much they cost, but I they were affordable given their size.


Tissue boxes


Yes, tissue boxes. There are homeowners who wish to hide their tissues (these are the same people who buy knit cozies for their spare toilet paper), so you can find these unfinished boxes at Michael's and other craft stores very inexpensively. Here's one I'm working on, which will ultimately be painted black and a surface applied to better show of this 1/48 A-4 Skyhawk.


Craft store bases


One final option are the unfinished bases you find at most craft stores. Please pardon me if I get on a soapbox, but when I've seen them used to display models at contests, they usually look cheap and shabby and almost always detract from what are otherwise excellent models. Unless you're a master woodworker, I suggest using one of the options I've described here.


Friday, October 10, 2014

Scale modeling is not art

A few days ago a friend shared a photo of a model on Facebook he thought was particularly well done (it was not my Gripen pictured below) with the comment, "Work of art!" I sent him a private message and told him not to use the word art, because scale modeling is not art. We had a brief exchange over whether scale modeling can be considered art, my friend taking the position that it is. It wasn't the first time this question has been debated, and it certainly won't be the last.

One of these is a great work of art, and the other is a plastic model.
I declare with as much finality as I can muster that, no, scale modeling is not art. Here's the conversation that I would likely have with the "Artist Wannabe" in our ranks.

SMS: What we do is not art.

AW: Of course it is! We use many of the same tools, media, and techniques.

SMS: Big deal. I used geometry, a saw, and sandpaper to fix the framing around a window in my house, but that doesn't make me a carpenter. Another example. I love to cook, and I'm very good at it. That does not make me a "chef." There's a big difference between my following a recipe to prepare a meal -- even when I improvise along the way -- and a trained chef who knows how to combine ingredients in new and unexpected ways. Calling myself a chef is an insult to the men and women who are.

AW: But we create things and make artistic decisions in the process.

SMS: We do create things, but we generally use parts and components that have already been created for us and follow a fairly strict process to bring them all together...using instructions, mind you! When we assemble the parts of a kit, there's only one "correct" way to do so, so there's negligible creativity in the output. If both you and I build a P-51, the results will pretty much look the same. Ask two artists to represent the feeling of love with paint and canvas and you'll likely get two very different paintings.

AW: Wait, I make artistic decisions. I decide what ordnance to use, how to paint my models, how to weather them.

SMS: Yes you do, but those decisions are constrained by norms about what is expected and even acceptable. That P-51 flown by Robin Olds can be painted only one way. Show too much creativity and scale modelers will dismiss your efforts as "fun" or "silly." Your decision to weather it -- often using off-the-shelf washes and pigments, by the way -- requires very little creativity on your part. The fact that there are so many articles and books that show us step-by-step how to achieve certain looks is evidence that many modelers are dismissing any desire to be creative in preference for proven techniques that are intended to achieve same result model after model after model.

AW: Wow, I never thought about it that way. Well what about modelers who scratchbuild models? Surely they're artists.

SMS: Nope. I'd consider them craftsmen or engineers. Like the kit builder, there's only one way to create a B-17, a Sherman, or the USS Kidd, even if you're scratchbuilding them.

AW: What about modelers who scratchbuild hypothetical vehicles or spacecraft? Are they artists?

SMS: Hmmm....maybe. Those guys are making some artistic decisions, so I'll give you that. But I'm uncomfortable saying they're artists because there's rarely any desire to convey emotion, feeling, or experience, which is often the desire in art.

AW: And the guys who sculpt figures?

SMS: I feel comfortable calling them artists. The difference between them and the majority of us is they're creating something out of nothing. That requires a great deal of creativity that we kit modelers don't use. When they bring original figures together in a vignette or diorama, there's great potential for creating something that anyone would describe as art.

AW: You make some good points, but I still like to consider what we do art.

SMS: Obviously you're free to do that, just as I'm free to call myself a chef. But do this the next time you meet a painter or sculptor; when he asks you what you do, tell him you're an artist, that you build scale models, and watch his reaction.

What say you? If you think I'm wrong, how would you argue all this plastic modeling stuff is art.

Monday, August 11, 2014

The best of the 2014 IPMS Nats

Another IPMS National Convention is behind us, and it was a good one. There were more than 700 registrants who entered more than 2,700 models. Any contest is an opportunity to be inspired, but the Nats offers the chance to see literally thousands of models at one time.

It wasn't until I was on my way home, when the Sirius/XM 80s channel played the Top 40 from 1984, that I realized this year marks the 30th year since I attended my first convention, the 1984 Nats in Atlanta. The show never fails to deepen my enthusiasm for the hobby.

The models were impressive this year, and if I have any regret it's that I didn't spend nearly enough time in the contest room. Next year I need to commit to spending at least 3-4 solid hours really studying the models to learn what I can.

I photographed quite a few models across all the categories, but here are a few that I thought were particularly impressive, interesting, or memorable. Go to my Google Picasa gallery to see 180 photos from the contest.

One of my favorite 1/48 scale entries, a perfectly painted and weathered SB2U.

My favorite 1/72 entry, an F6F Hellcat. It was one of the best weathered 1/72 scale aircraft I've ever seen.


A beautifully executed 1/48 Ju-88 A-4 by Ricard Rivas of Venezuela.


My favorite 1/32 scale aircraft in the competition, an F-84G with a flawless natural metal finish.


Another favorite 1/72 entry, a AH-1W Cobra. It's rare to see a helicopter built and weathered so well.


A gorgeous vacuform PD-1 Flying Boat.


I'm a sucker for the obscure and unusual, so this scratchbuilt 1/72 Italian Obicie 305/17 DS artillery piece caught my eye.


An amazing scratchbuilt 1/9 scale Ariel W/NG 350cc Italian motorcycle by Alex deLeon, which took Best Military Subject. His trike (pictured on the IPMSs web site) won George Lee Judges' Grand Award.


A stunning 1/350 SMS Vulcan, a U-boat salvage tug.


Who doesn't like a red Ferrari. Here's a gorgeous 1/24 Fujimi 1972 Ferrari Daytona Spider.


Classic car lovers appreciated this 1/25 Moebius 1952 Hudson Hornet.


An excellent 1/20 Masterpiece Miniatures Apollo Saturn V engine by Ronnie Rutherford.


Best Space/Science Fiction Vehicle went to this amazing scratchbuilt 1/48 Curiosity rover by Mike Mackowski.


This Imperial II Class Star Destroyer had lights and everything!


If I were to give an award for most unusual model, it would be for this paper model of a Teddy Bear, seen in the pre-teen categroy. Seriously, that has to warm your heart, right?


See you in Columbus, Ohio next year!